
 I always seem to purchase too much fruit for one person to reasonably eat, so end up with a glut of it on the verge of going off. In my search for a way to use up some pears, I came across this gluten free tart in a recipe on the Food Network site. It doesn't really have a cake texture, more of a squidgy/meringue-y/sticky goodness texture... and if that's not enough to sell it I don't know what is.
Pear Almond Tart:
2 ripe pears
1/2 tsp cardamom
1 tbsp sugar
2 cups ground almonds
6 eggs
1 3/4 cups sugar
1/4 tsp almond extract
Preheat oven to 350F/180C and butter a 14"x3" pan or tart shell. Halve and core the pears, then toss with cardamom and 1 tbsp sugar. Blend together almonds, eggs, 1 3/4 cups sugar, and almond extract, then pour into your buttered pan. Press the pears into the batter, cut side up. Bake for 40-50 minutes.
Wednesday, April 6, 2011
Anna Olson's Pear Almond Tart
Sunday, November 21, 2010
Almost Pocky
 I thought it would be a cute idea post-Japan to give home-made Pocky out as a Christmas treat, so this weekend I roped Court into helping me out. As she said, our efforts were "not quite Not Quite Nigella" (whose recipe & instructions I pinched). The dough was not the easiest to make without a stand mixer but I managed, and the results are remarkably close to the real thing. It also made for a fun afternoon of decorating, even if our artistic skills are approximately Grade 4 level (and I'm being generous here). For toppings, we had dark, milk, and white chocolate, and some green tea chocolate made by mixing matcha into white chocolate. Everything else was whatever I could find in the pantry: - dark chocolate shavings - yellow & pink decorating sugars - cashews - dried cranberries - ground almonds - candied ginger - kinako powder - sea salt - pepper - chili powder
Tuesday, October 19, 2010
Rainbow Cake
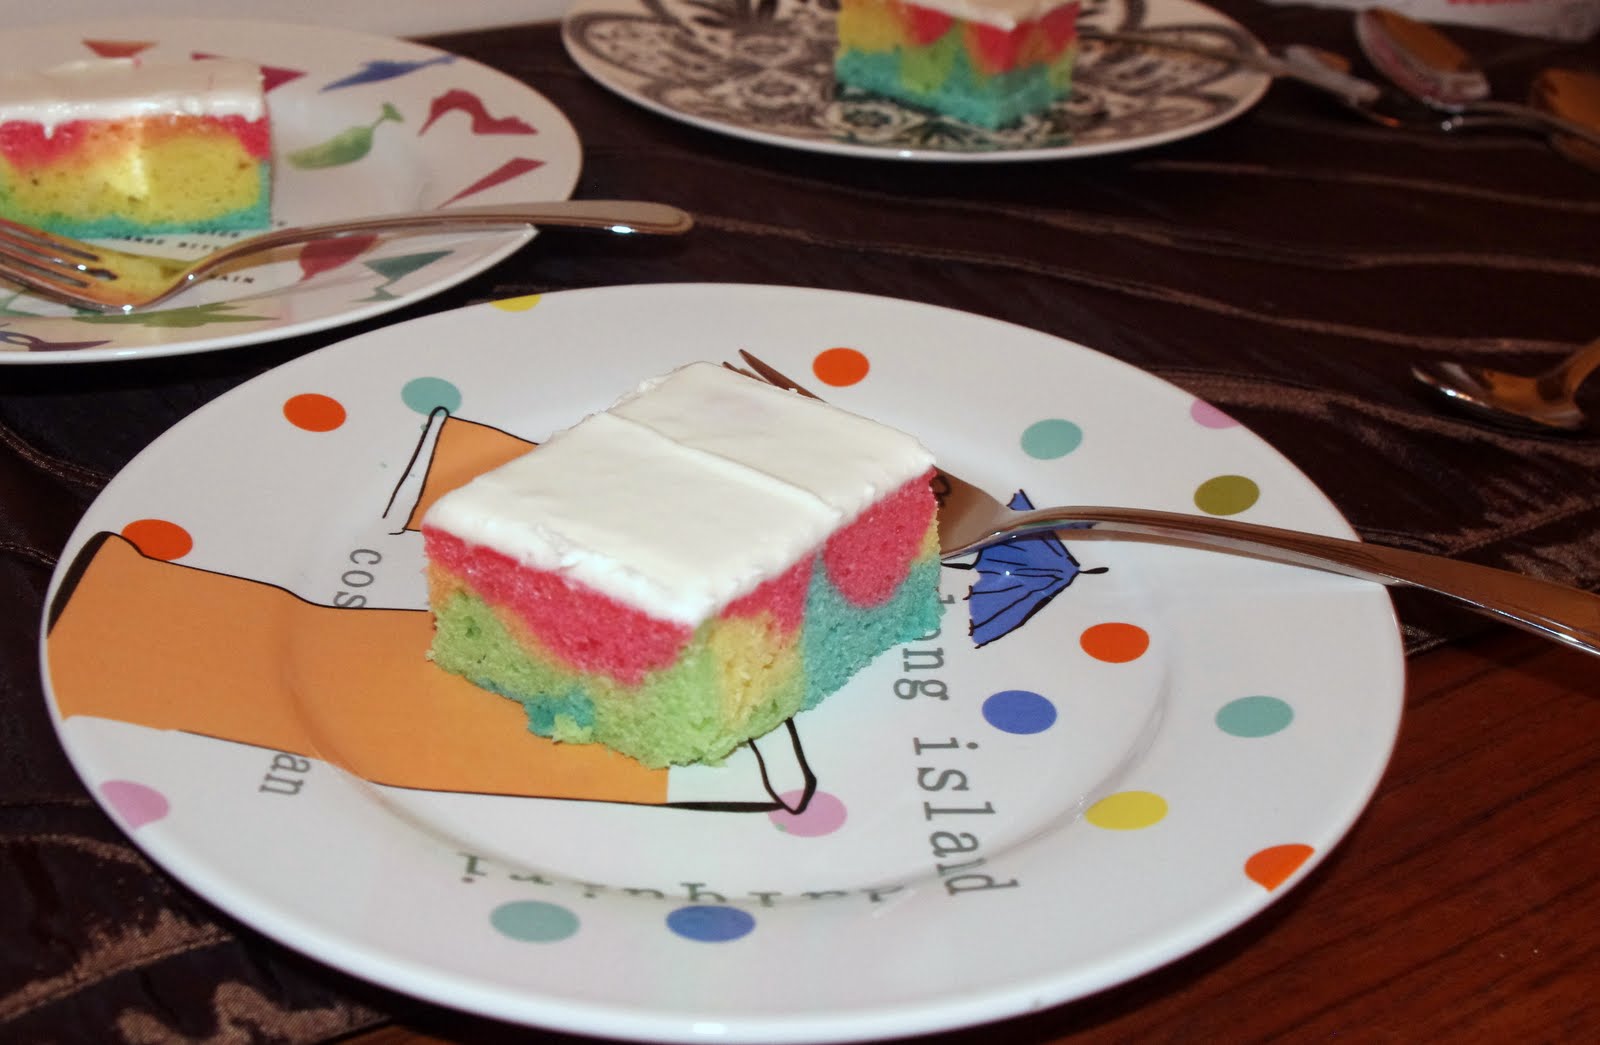 My baby's favourite colour is rainbow (okay, my favourite colour for her is rainbow), so I went with that as a theme for her first birthday (how is she one already!?!?). I know, I know, it's not exactly new anymore, but I wanted to do something cute without spending hours piping little icing rosettes all over a cake. I just don't have time to spend 5 hours making a first birthday cake that she won't even remember. This rainbow cake is a great solution because it takes about 2 minutes more than any normal cake. I used a nice sugary, buttery cake recipe that has gone over well in the past. It freezes well, so I got to make it a couple of days in advance. All I did was put the batter into 5 cereal bowls and coloured each one with different food colours (yellow, orange, red, green, and blue).
  Then I drizzled each colour into the cake pan.
  Unlike marble cake, I don't swirl the colours because I want them to all be visible themselves.
 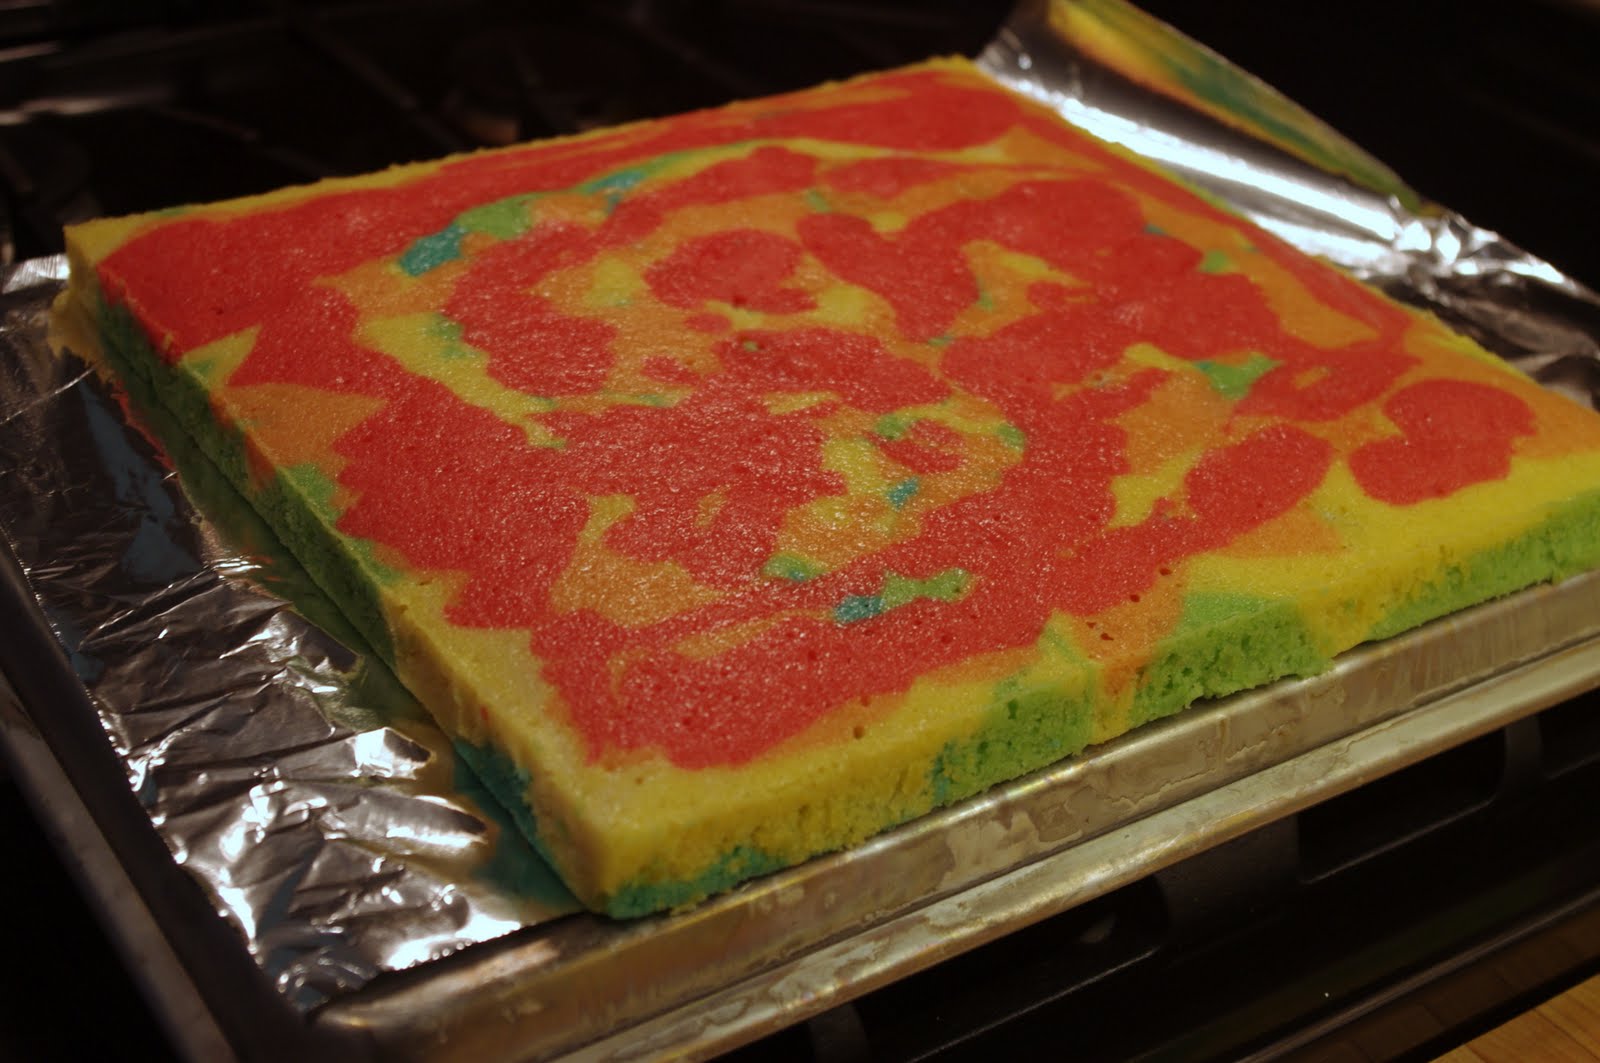 To finish, I iced the cake with a plain white buttercream icing. I just wanted it to look really plain on the outside so that it would be more of a surprise when it was cut. My daughter stuffed as much of a full piece as possible into her mouth and gobbled it up, so it went over well with the target audience.
Sunday, April 4, 2010
Syllabub
 Syllabub is a seriously easy dessert that only requires 3 ingredients and about 10 minutes of your time. It also seems great for parties or an after dinner treat as, being very rich, it lends itself well to small portions. It also is extremely adaptable - you could use any liqueur to flavour this. This time I went slightly asian to match my dinner, but I think next time I'll try Cointreau and orange peel, or maybe Chambord and raspberries, or maybe...
Matcha Syllabub (serves 4):
1/3 Zen Green Tea Liqueur
2 tbsp sugar
1 cup/250 ml heavy cream
matcha powder (optional)
Pour the green tea liqueur into a bowl with the sugar and whisk to dissolve. Next, whisk in the heavy cream and whip until it has thickened but is still soft and billowy. I sprinkled matcha powder on top for an extra punch of green tea flavour.
Thursday, January 21, 2010
Quince Clafoutis
 Quince is not something I'd ever cooked with, or even tasted, before. Naturally that meant that when I saw some at Sobey's I had to purchase it. And then it sat for ages in my fruit bowl until finally I figured they would need to be used before they starting going off. I decided to poach these (as they cannot be eaten raw) and use them in an adapted clafoutis. It's a French recipe that's a little bit asian, with star anise in the poached quince and Zen Green Tea liqueur in the clafoutis.
Step 1: Poaching the quince.
4 cups water
1/2 cup sugar
a couple of star anise or stick of cinnamon
3 quince
I tried to peel these, then got lazy and gave up. They were simply chopped and cored and dropped in the poaching liquid, then simmered for an hour plus. These need to be drained very well, as they retain a lot of liquid. I let them sit overnight in the fridge to get as much liquid out as I could. They have a lovely fragrant flavour and would be delicious on their own just after poaching, but I didn't want the extra liquid to ruin the clafoutis.
Step 2: Making the clafoutis.
3 eggs
1/3 cup sugar
6 tbsp flour
1 1/2 cups heavy cream
zest of 1 lemon
1/4 tsp salt
2 tbsp Zen Green Tea Liqueur
3 quince, poached
Preheat the oven to 375F/190C. Butter a 1 quart/1 litre dish and sprinkle the bottom and sides with sugar. In a bowl, beat the eggs and sugar until light and fluffy, then mix in the flour, cream, zest, salt, and liqueur. Set that aside and line the dish with your poached quince. Pour the batter over the quince and bake around 40-45 minutes until the custard is firm and golden.
Wednesday, January 13, 2010
Crème Brûlée

This recipe is from John Burton Race's book, French Leave. It was my first crack at making Crème brûlée, and I expected it to be difficult, but it was surprisingly easy! Seriously, I wouldn't say it if it wasn't true. It amazes me that I have had so many bad brûlées at restaurants in the past (seriously - scrambled egg consistency at a high end restaurant that I won't name!). This is going to be a bad bad thing for me, as I will likely start keeping full cream in my fridge at all times and make this very regularly. Methinks that will not help me on the road to losing the baby weight...
Crème Brûlée (Serves 4):
2 egg yolks
90 grams caster sugar (seeing as we are in North America I used fine berry sugar)
1 vanilla pod (I used vanilla extract about a teaspoon)
70 mL milk
175 mL double cream
Put the egg yolks and 40g of the sugar into a bowl with the vanilla and whisk to a smooth paste. Add the milk, whisk in the cream (thicken a bit, but it won't be like whipped cream), pour into four ramekins and refrigerate for an hour before cooking.
Preheat the oven to 300F/150C and put the ramekins in a shallow pan filled with water to a depth of about 2.5 cm (1 inch) as shown. The brûlées will take about an hour in the oven to set. When cooked, remove from the oven and let the brûlées cool to room temperature.
When you are about ready to serve, sprinkle the tops with the remaining sugar and put them either under a very hot broiler or use a torch to caramelize the sugar. Using high heat is important because you want to create the sugar crust on top, but not warm the custard through and make it runny. Serve right away.
This is so good I am thinking about making it for breakfast now, thank goodness I don't have any cream on hand and I have a baby that will be back up to eat again any second!
Sunday, December 20, 2009
Reese's PB Cookie Tarts

Well, here it is almost Christmas time. As I mentioned in my last cookie post, my mom came by to help me with Christmas baking (and more importantly child minding). This cookie is a real hit with all peanut butter and chocolate lovers. It looks really cute too!
Reese's PB Cookie Tarts:
1/2 cup margarine
1/2 cup peanut butter
1/2 cup granulated sugar
1/2 cup brown sugar
1 egg
1/2 tsp vanilla
1 1/4 cup flour
3/4 tsp baking soda
1/4 tsp salt
1 package mini peanut butter cups
Cream the margarine, peanut butter, sugars, eggs and vanilla together. In another bowl, sift together the dry ingredients and blend into the creamed mixture. Shape into 1 inch balls and press into ungreased mini muffin tins (tins should be about 3/4 full).
Bake at 350 for 8-10 minutes - don't over bake! While cookies are baking, unwrap the peanut butter cups, and keep them in the fridge. As soon as you remove the cookies from the oven, press a peanut butter cup into the centre of each cookie. Work quickly while the cookies are still soft and hot. Let the muffin tins cool completely before removing the cookies.
Tuesday, December 15, 2009
Pear Clafoutis
 Court and I invited the family over for a spur of the moment french dinner, featuring rabbit stew and this clafoutis for dessert. When we were deciding on what to make, we wanted something relatively simple since we were putting most of our effort into cooking rabbit for the first time. We remembered Chris' experiments in clafoutis back in June and decided to try our own.
Pear Clafoutis (adapted from Ina Garten):
1 tbsp butter, softened
1/3 cup sugar, plus enough to line dish
3 eggs
6 tbsp flour
1 1/2 cups heavy cream
seeds from 1 vanilla pod
zest of 1 lemon
1/4 tsp salt
2 tbsp cognac
2-3 ripe Bartlett pears
Preheat the oven to 375F/190C. Butter a 1 quart/1 litre dish and sprinkle the bottom and sides with sugar. In a bowl, beat the eggs and sugar until light and fluffy, then mix in the flour, cream, vanilla seeds, zest, salt, and cognac. Set that aside and peel and slice the pears to line the dish. Pour the batter over the pears and bake around 30-40 minutes until the custard is firm and golden.
We used vanilla seeds instead of extract and added the cognac, and then tried to convince ourselves that fruit desserts are always healthy.
Saturday, December 12, 2009
Oatmeal Chocolate Chip Cookies

The other day my lovely mother came over to help me watch the baby, and we did some Christmas baking. We actually made four different things all in one day! It's wonderful because now when people pop over I have sweets to pull out of the freezer. It also doesn't hurt that I refer to my mother as the baby wisperer. Seriously, the woman can calm the most angry baby as if it is nothing! There are days I wish she would move in with me...
These cookies are from my Canadian Living cookbook that I got when I got married. My husband thinks they are better than when I make my mom's chocolate chip cookies with pudding mix. I can't say I agree, but they are pretty good.
Oatmeal Cookies:
2/3 cup softened butter
1 cup brown sugar
1 egg
1 tbsp vanilla
1 tsp cinnamon
1 1/2 cups quick oats
1 cup all purpose flour
1/2 tsp baking powder
1/2 tsp baking soda
1/4 tsp salt
3/4 cup chocolate chips
1/4 cup chopped walnuts
In a large bowl beat the butter and brown sugar until fluffy. Beat in the egg, vanilla, and cinnamon. In a sparate bowl mix the oats, flour, baking powder, baking soda and salt. Stir the dry mixture into the wet mixture along with the chocolate chips and walnuts.
Drop by heaping spoonful onto greased baking sheets and bake at 375 F for 10 minutes or until golden. Delish and great for freezing!
Saturday, November 28, 2009
Delia Smith's Chocolate Bread and Butter Pudding

Okay, it's not that I am not cooking or eating, I just haven't had time with the little one to then take pictures and write about it. Basically I end up making food as fast as possible and then either relish the few second I have to eat with both hands free or I end up eating while holding her or feeding her. This was actually made the weekend before I had the baby, back when I still had time to photograph things not baby related. It is delicious though. It's not just kind of delicious, it is amazingly delicious if you like dark chocolate. It's like a mix between the perfect gooey brownie and a chocolate lava cake.
I've never made bread pudding before, it just isn't the first thing that comes to mind for me when I think about dessert. My husband picked it out though when I told him that he had to pick a cake for me to make for him for his birthday. It was a big hit all around, I can't wait until I have an occasion to make it again so I can show off. I also like that you make it a day ahead, and then just pop it in the oven when the time comes.
Chocolate Bread and Butter Pudding:
9 slices, each ¼ inch (5 mm) thick, good-quality white bread, 1 day old, taken from a large loaf
5 oz (150 g) dark chocolate (75 per cent cocoa solids)
3 oz (75 g) butter
15 fl oz (425 ml) whipping cream
4 tablespoons dark rum (I used Kahlua instead)
4 oz (110 g) caster sugar
good pinch cinnamon
3 large eggs
Begin by removing the crusts from the slices of bread, which should leave you with 9 pieces about 4 inches (10 cm) square. So now cut each slice into 4 triangles. Next, place the chocolate, whipping cream, rum, sugar, butter and cinnamon in a bowl set over a saucepan of barely simmering water, being careful not to let the bowl touch the water, then wait until the butter and chocolate have melted and the sugar has completely dissolved. Next, remove the bowl from the heat and give it a really good stir to amalgamate all the ingredients.
Now in a separate bowl, whisk the eggs and then pour the chocolate mixture over them and whisk again very thoroughly to blend them together. Then spoon about a ½ inch (1 cm) layer of the chocolate mixture into the base of the dish and arrange half the bread triangles over the chocolate in overlapping rows. Now, pour half the remaining chocolate mixture all over the bread as evenly as possible, then arrange the rest of the triangles over that, finishing off with a layer of chocolate. Use a fork to press the bread gently down so that it gets covered very evenly with the liquid as it cools.
 Cover the dish with clingfilm and allow to stand at room temperature for 2 hours before transferring it to the fridge for a minimum of 24 (but preferably 48) hours before cooking. When you're ready to cook the pudding, pre-heat the oven to gas mark 4, 350°F (180°C). Remove the clingfilm and bake in the oven on a high shelf for 30-35 minutes, by which time the top will be crunchy and the inside soft and squidgy. Leave it to stand for 10 minutes before serving with well-chilled double cream poured over.
Monday, November 2, 2009
English Apple Cake
 With my bags of apples from Superstore I needed some simple recipes. Attempting to bake in the midst of messy home renos was trying, to say the least. Luckily, Nigel Slater did not fail me; I often find his simple, thrown-together meals are the tastiest.
I've now made this three times as it is so quick & easy. The apples don't need to be peeled, just cored & roughly chopped, and while it needs an hour of baking time it only takes 10 minutes of prep. It also adapts well to changes, which is not always true of baking. I changed the pan from an 8" square to an 8" round as that was what I had unpacked, and switched lemon juice for lime juice (which I now prefer).
Nigel Slater's English Apple Cake:
130g butter
130g sugar
3-4 medium apples
juice of half a lemon or lime
1/2 tsp ground cinnamon
2 tbsp brown sugar
2 eggs
130g flour
1 tsp baking powder
Preheat oven to 350F/180C. Line an 8" round springform pan by just pushing parchment paper inside so it comes up the sides of the pans. It doesn't matter if this isn't pretty, as this cake is pretty rustic anyway. There is no need to grease the pan, making for easier clean-up as well.
Core and chop the apples and put in a bowl with the lemon or lime juice. Toss with cinnamon & brown sugar and set aside while you cream the butter & sugar well, then beat in the eggs. Sift the flour and baking powder together and fold into the mixture. Scrape the batter into the pan and dump the apples on top with a little extra sugar. Bake 1 hour. You may be unsure about done-ness as it's difficult to tell with all the apples on top, but each time I've made this 1 hour has been perfect. 
Sunday, November 1, 2009
Spiced Applesauce
 We're back! After a month-long hiatus (and some pretty sporadic posting in September), I am hoping to get back into the swing of things by participating in National Blog Posting Month. We were pretty busy in October - me with home renovations and Court with her new baby girl - and with the holiday season coming up things will probably stay that way. Hopefully we'll be up for the challenge.
Discovering orchard bins of apples at Superstore has meant a glut of baking for me recently. Who can resist apples at $0.54/lb? They're a little banged up, but perfect for cakes, pies, and (obviously) apple sauce. I tweaked this a bit by using Lyle's Golden Syrup (which I could eat by the spoon) instead of sugar and cardamom instead of cinnamon. This was warm, fragrant, and delicious... and perfect for autumn.
Applesauce:
4 apples, peeled/cored/chopped
3/4 cup water
2-3 tbsp Lyle's golden syrup
cardamom, to taste
Add apples and water to a saucepan over medium heat and cook until soft. Bash up with a spoon over the heat and add the syrup and cardamom, both to taste.
Wednesday, September 9, 2009
Easiest Chocolate Mousse - Take 2

It's hot out, I have six and a half weeks left until the baby finish line, and although I am madly craving sweets, I don't want to heat up my house any more or stand for any long periods of time. The other day I had run out of my freezer stash of baking, and I sunk to looking for chocolate chips to eat. Sadly, that wasn't far enough for me to go as I realized I was out of chocolate chips and I then resorted to eating squares of baking chocolate. This is what my life has come to. In honor of that, I am reposting my easy chocolate mousse recipe, which I made in white chocolate version this time (because I had white chocolate baking squares that I hadn't gobbled up in a fit of desperation). Topping it with fruit makes it healthy, I promise. The raspberries are part of the bounty I harvested off the bushes behind my garage all summer long.
If you have been reading us for a long time, you may recognize this as the first post we ever did :-)
Chocolate Mousse:
6 squares of bakers chocolate (any kind you like)
1 ½ cups whipping cream
Combine the chocolate squares with ¼ cup of the whipping cream and microwave for 1 minute on high. Give it a stir and then microwave it for 30 seconds to 1 minute more. If you chop up the chocolate it takes a bit less time. If it is not melted fully after the second minute, just stir it until it has melted. Let the melted chocolate sit for about 20 minutes or until close to room temperature.
Whip the remaining 1 ¼ cup of whipping cream and fold it into the cooled chocolate mixture. If the chocolate mixture is still quite warm, give it some extra time or the whole thing will curdle, and you will be very disappointed after smelling delicious melting chocolate to not get a nice mousse to eat in the end. Refrigerate for two hours.
Tuesday, August 18, 2009
Bavarian Apple Torte
 Oh the baking we are doing! Last weekend my block had a block party, and someone with an apple tree brought apples to share with everyone. I love free produce! Of course, apple pies will be made, but this dessert is another I love to make with apples. It combines the goodness of apple pie with my weakness - cheesecake - and still manages to taste like a light summertime dessert. I am pretty sure this recipe exists with about a million minor variations, but here is the one I got from my mom years ago and have been using ever since.
Bavarian Apple Torte:
Crust:
1/2 cup margerine or butter
1/3 cup sugar
1 cup all-purpose flour
1/4 teaspoon vanilla
Filling:
8-ounce package of cream cheese, softened
1/4 cup sugar
1 eggs
1/2 teaspoon vanilla
Topping:
4 cups thinly sliced, peeled, tart apples
1/3 cup sugar
1/2 teaspoon ground cinnamon
Additional Topping:
1/4 cup sliced almonds
My version is probably a bit heavier on the apple topping, and a bit easier on the cream cheese filling than some. Yes, it does make me feel like I am making a "healthier" dessert despite all the sugar.
Combine the crust ingredients and press into a spring form pan to bake for 5 minutes at 350 F. Cool and then top with the cream cheese filling (combined) and then the apple topping (combined). Finally sprinkle the sliced almonds on the top and bake at 450 F for 10 minutes followed by 400 F for 25-30 minutes. This dessert needs to sit in the fridge overnight if you want it to serve nicely. If you don't care if it slides around, you can serve it the day you make it. I will admit, I do that sometimes and just serve it in bowls. Not as pretty, but just as tasty.
Monday, August 17, 2009
Berry Picking Brings Pie
 Ever since winter, Court has been talking about visiting some U-Picks as neither of us had been before. Because we work on the west end, she chose South Windermere Gardens as our destination. We both expected that picking would take a couple hours, but in under 30 minutes we had an ice cream pail full of strawberries each, and another half hour got us each about 1/2 a pail of saskatoon berries. When I got home that night, I quickly cleaned and froze everything (except a couple days' worth of strawberries) as I had no immediate plans for anything.
This was several weeks ago, and I've been so busy lately I hadn't done anything wi th my pickings. With a move coming up next month, I figured I should try to consume most of my perishables just to avoid having to pack up frozen goods for transport. My freezer is packed full of fruit and vegetables from this year (and last years!) harvests, so it seemed like a good time to try making a berry pie for the first time.
Saskatoon Rhubarb Pie Filling (1 x 9" pie):
500g saskatoon berries
300g rhubarb, cut in 2cm lengths
1/4 c water
3/4 c sugar
3 tbsp cornflour
2 tbsp lemon juice
Preheat the oven to 425F/210C. Put the fruit and water in a large pot and simmer 10 minutes, then stir in the sugar, cornflour, and lemon juice. Pour the filling into a pastry lined pan, wet the edges with water, and seal the top pastry layer on. Bake 15 minutes at 425F, then reduce the heat to 350C/180C and bake for a further 35 minutes.
I got very lazy and bought a pie crust, which was a mistake. I am not that fond of flaky pastry crusts and much prefer a shortbread pie crust. However, I have yet to find a good recipe for one and am no longer in the UK where they can be found at the supermarket. I've learnt my lesson though - this filling was good but the crust had that not-so-delicious store-bought taste.
Thursday, August 13, 2009
Raspberry Peach Crisp
 I know, I have been lax in my posting lately. It's been hard to avoid, we have been doing a lot of gardening (picking and preserving), and still trying to enjoy the little bit of summer we have been getting here on and off. To add to that, I'm now in trimester three of the pregnancy and am suddenly really starting to feel gigantic and immobile! Okay, enough with the excuses. In light of the fact that I bought a whole pile of peaches from the farmer's market in a fit of craving, and a few of them were getting dangerously close to the end of their lifespan, I ran out back and picked some raspberries and threw together a lovely raspberry peach crisp last night (no it wasn't my supper.... fine, it totally was my supper! I was dining solo and it fit the bill).
I know Brooke posted a rhubarb ginger crumble not too long ago, but crisps and crumbles really are such a great easy way to enjoy summer fruit in all its glory. I love that it is the type of baking that allows me to proceed the same way I do when I cook (throw things in rather than measuring). I did start with a recipe that I found on Tastespotting (and split in half):
Raspberry Peach Crisp
for the fruit:
6 ripe peaches- not overly ripe -sliced
1 pint raspberries
1 -2 T flour -depending how juicy the peaches are
1/3 cup sugar
1/2 t cinnamon
for the crisp:
3/4 cup light brown sugar
1/2 cup butter
3/4 cup white sugar
1 cup flour
1t cinnamon
1 cup oatmeal (not instant - Court: I totally used Quick Oats)
Preheat oven to 350
Toss the fruit in a bowl with the flour and sugar- try not to break up the berries.. Put it in an ovenproof about 9 x 13 baking dish- or individual oven proof bowls
Mix butter, sugars, 1 t cinnamon until well combined. Add the flour and oatmeal. Crisp topping should be fairly dry, but when pinched together it should stick together. Spread topping over the fruit with a light hand- don’t pat down- it should look crumbly. Bake for about 25-35 minutes until juices are bubbly and topping is crisp. Serve warm with ice cream.
I made mine in a small round baking dish (that I threw in the freezer after making for post baby entertaining), and then had two servings that I made in little single serve dishes to enjoy last night and tonight. I love pairing peaches and raspberries because the tartness of the raspberries go so well with the sweetness of the peaches in my opinion. Oh yeah, the creaminess of the melty ice cream doesn't hurt either :-)
Tuesday, August 11, 2009
Ice Cream 2 Ways
 Often when I'm entertaining the last thing I want to worry about is dessert. I kind of turn into a nightmare in the kitchen while I'm finishing off the final touches, so it's nice to have simple stand-bys to fall back on. Usually there is so much food that dessert is almost an afterthought anyway.
 I usually have vanilla ice milk in my freezer (my favourite is Island Farms), and it's easy to make this a casual treat or a slightly fancier dessert. To class things up a bit, just put a scoop of ice cream in a pretty glass and pour over hot unsweetened espresso. The ice cream sweetens it as it melts, and it's a delicious substitute for after-dinner coffee. For lunch-time treats, serving the ice cream with fresh berries or fruit is always delicious. I've made this look a little cuter by lining a small tupperware container with cling film and using that to form the ice cream into little cakes. I like this best with fresh peaches, but this time I used what I had - ripe mangoes and blackberries.
Thursday, July 23, 2009
Rhubarb Ginger Crumble
 Over the weekend we finally chopped down all of Court's rhubarb, and ended up with a harvest of just over 2 kilos. Result! This is one of my favourite recipes; it has been adapted from Delia Smith's Rhubarb and Almond Crumble - I have changed it to Rhubarb Ginger Crumble as the major change is that I've tripled the amount of ginger from the original recipe. So tasty that even Court said she may not hate rhubarb as much as she thought.
Rhubarb Ginger Crumble:
1 kg rhubarb
125 g sugar
1 rounded tbsp fresh grated ginger
125 g almonds (whole or chopped)
80 g chilled butter, cubed
180g self raising flour
2 tsp cinnamon
1-2 tsp ground ginger
125 g dark brown sugar
Preheat the oven to 400F/200C. Chop the rhubarb into 1 inch (2.5cm) lengths. Mix with the sugar and fresh ginger and set aside. In a food processor, add the almonds, butter, flour, cinnamon, ginger, and brown sugar and process until the almonds are mostly finely chopped.
In an 8"x11" baking dish, press the rhubarb mixture firmly in so it is spread evenly. Sprinkle the crumble mixture all over the rhubarb and press it down firmly all over; the more tightly it is packed together the crisper it will be. Finally, lightly run a fork all over the surface. Bake the crumble in the preheated oven for 35-40 minutes. Leave it to rest for 10 minutes and then serve.
Monday, July 20, 2009
In Search of Candied Violets
 Candied violets seem to be impossible to find in Edmonton. My own searches came up with nothing and a post on Chowhound also came back with some good ideas but no source. Instead of buying them online, I figured it would be just as easy to make some of my own - fortunately Court offered her help (and flowers) to do this. I imagine sourcing edible, pesticide-free flowers might have be a little difficult if she didn't have an abundance in her garden.
Candied Flowers: 
1 egg white
water
caster (berry) sugar
These were simple enough to make, though tedious. Using a small paintbrush, paint the flower with the egg/water mixture, then dip it into a bowl of superfine sugar. Move to dry on a baking sheet with wax or parchment paper. See? Simple. It did take several hours though to finish our small bowl of flowers. The end result was worth it though - these really made a plain wedding cake stand out.
Monday, July 6, 2009
Super Soft Chocolate Chip Cookies
 All of the baking I've been doing lately is negating my healthy summer salads, I think. To stop myself from eating it all, I've been spreading the love around to my family, friends, and coworkers. These are my absolute favourite chocolate chip cookie. While I love a crisp biscuit, chocolate chip have got to be chewy. And they are so versatile as well: kid-friendly ice cream sandwiches above, or dainty afternoon-tea size below.
Chocolate Chip Cookies:
1 1/3 cups butter or block margarine
1 cup sugar
1 cup tightly packed dark brown sugar
2 eggs
2 tsp vanilla
1 tsp baking soda
1/2 tsp salt
3 1/2 cups flour
5-6 ounces (1 pkg) chocolate chips
Preheat the oven to 375F/190C. In a large bowl or stand mixer cream together the butter and sugars, then beat in eggs and vanilla. Stir in baking soda and salt, then mix in the flour until well combined. Add chocolate chips - I usually use less than the recipe calls for as I like the cookie better than the chocolate, but I seem to be in the minority. This dough will be quite stiff, so if you have a stand mixer use it! Drop dough by rounded tablespoonfuls about 2 inches apart onto a baking sheet. Bake for 8-9 minutes or until light brown (the centres will be soft), then remove to cool on newspaper. I like to think this soaks up anything unhealthy about these.
